


Cricut glass etching is a great way to make gifts amazing. I knew that I could figure this out with my Cricut Machine so I taught myself how to etch glass.
My DIY cricut glass etching method looks just as good as any laser etched glass products.
I really enjoy etching glass with and using my Cricut to create stencils to etch the glass. Above all, my Cricut has been everything I needed it to be, and now its a laser cutting and laser system too.
And by now we all know how magical the Cricut is and the fact that there is so many things you can do with this beautiful machine!
How To Etch Glass With The Cricut

Like yesterday I used it to make these cute planner stickers, you can go over and download the free template.
But before now, did you know that you can do Cricut glass etching?
Well not exactly with the Cricut, but it is an important part of the overall process.
In this post, you will learn how to etch glass with the Cricut.
You can use any of the machines to for Cricut etching, from the original machine to the Cricut explore air right down to the Cricut Maker.

What do I need for Cricut Glass Etching?
- A Cricut Machine
- Armour Etch, Etching Cream
- Glass (I used these for my project)
- Paint Brush, I like to use single brushes or foam brushes
- Cricut Vinyl
- Transfer Tape (contact paper like this works amazingly)
And you can use painters or masking tape to block off areas that you don’t want the etching cream to touch.
In the past, I have used Cricut etching, to make drinking glasses, wine glasses and a variety of materials.
Firstly, you want to start by cleaning the area to be etched with alcohol, well you can do this after you have created your design in Cricut Design Space.
Once you have your design and clean glass, place the adhesive vinyl on your cutting mat and load it into your Cricut machine to cut.
When it is done unload the mat, and weed your vinyl, and place it on your glass surface.
Most importantly, you want to make sure you wear gloves for this part. Using a paintbrush, brush on a layer of etching cream.
Wait for 3 to 5 mins and then rinse with warm water to reveal your etched design.
Now you can, show super easy it is to etch glass.
My first Cricut glass etching project of this type was a wine glass I made for my mom for a birthday. This was years and years ago.
Cricut has changed a ton since then. For instance, at the time I had the original Cricut and I didn’t have the ability to upload my own design or access to Cricut Acess.
Now you do! And there are a ton of premade designs you can choose to make your project pop.

Check out these other amazing Cricut Projects!
Cricut Maker Review plus How To Cut Wood Earrings With Your Knife Blade
How To Make A Baby Milestone Blanket
Planner Stickers to Print Then Cut With Cricut
How To Etch Glass With The Cricut
Learn how to etch glass for beautiful gifts and home decor projects. Find out how your Cricut to crate stencils for glass etching.
Materials
- Armour Etch Glass Etching Cream
- Glass (I used these for my project)
- Paint Brush
- Cricut Vinyl
- Transfer Tape
Tools
- Cricut Machine
- Standard Cutting Mat
Instructions
- Create your design
- Use your Cricut to cut it
- Weed in reverse (take out the letters or images you want to see on your etched glass.

- Using the transfer tape, transfer the design to your glass tile
- Apply a layer of etching cream

- Allow to sit and work 3 to 5 minutes
- Rinse with warm water making sure there is no cream left behind
- Remove the vinyl to reveal your design

- Optional* Cut and place an over lay of vinyl on the glass

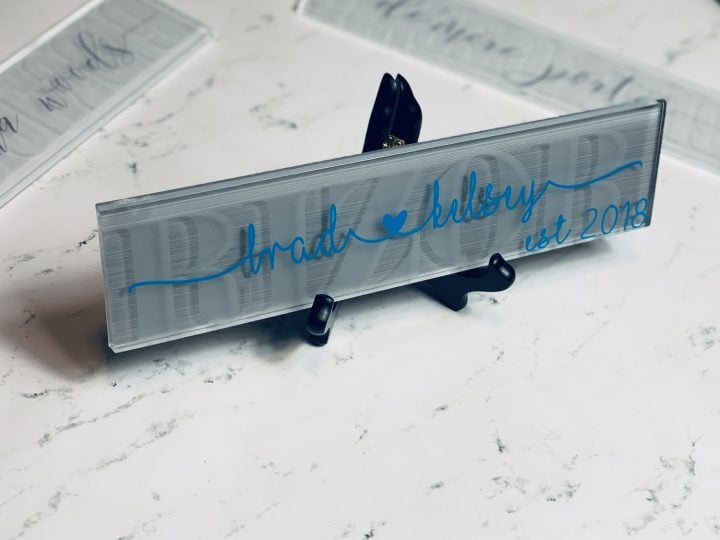
The letters seem to be blue. Did you paint them or is that what they look like when etched?.
It takes the the color that the glass is. But these are white. No blue.
What font is the vinyl overlay with the two names connected with the heart? Also, thank you so much for the instructions! I’m excited to try this!
It’s called I love glitter
Do you do the etching on the back of the glass so it shows thru to the front of do you etch on the front? If on the back I have to mirror my stencil right?
On the front ☺️
Where did you get your glass from?
I can’t remember right off, but they are linked in the post.
Love the tiles! Is there a backing on them? It doesn’t appear to be see-thru. Thanks so much!
They are bathroom tiles, so they are already backed.
Thank you . 🙂
No problem
I see you have colors in them. Is that vinyl or is there a way to color the etch?
Can you tell me what tile you used for the brad and kelsey tile? I love the subtle, striped back.
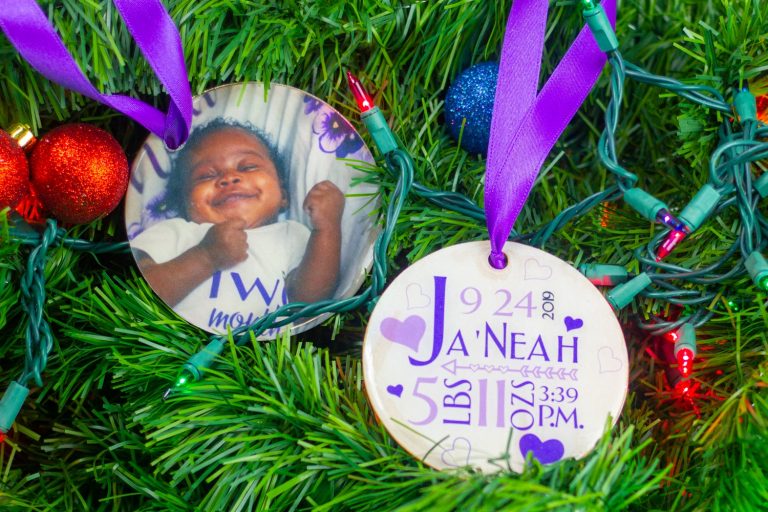
What font did you use on the Mom tile. For the word mom.
I’m sorry I can’t remember.
Hi. What fonts did you use for MOM and LPN? Thanks!
I’m sorry I can’t remember.
Good morning! Can you tell me what don’t you used for “Jamela jashauna and janieka” ? Thank you so so much!
This is it here https://bit.ly/340r0qH