

This is a sponsored conversation written by me on behalf of Cricut. The opinions and text are all mines.
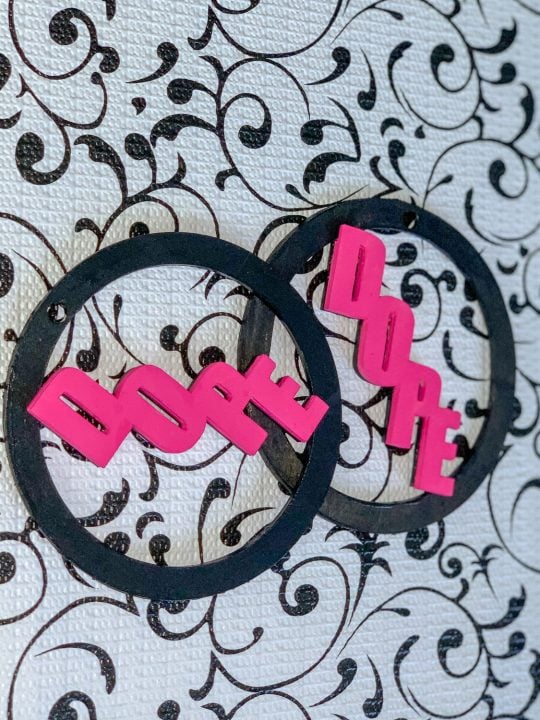
The first thing I wanted to do when I got my new Cricut Maker was make wood earrings. This cricut earring Idea was made out of balsa wood.
I didn’t need an SVG file, I just used the shapes in design space. Although it would have been easy to make these earrings as a small project, I wanted something huge and 80s style.
This Cricut Cutting Machine is perfect for so many project ideas.
Cricut Basala Wood Earrings
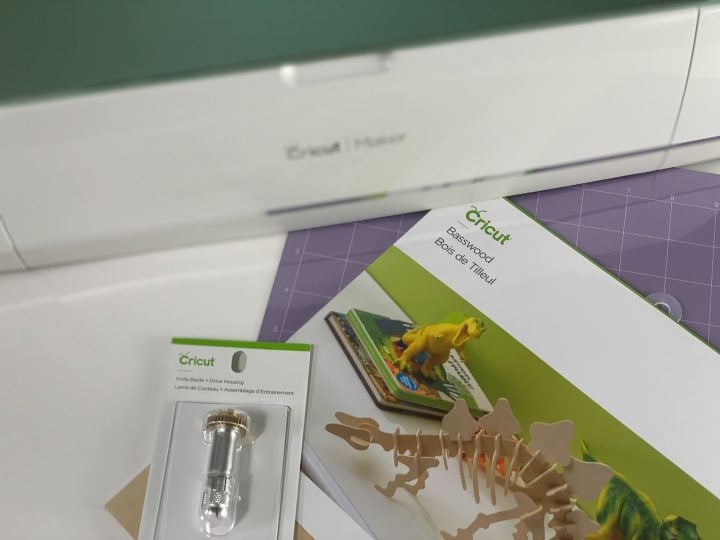
I thought about vinyl crafts, and paper crafts and even fabric crafts (yes it cuts fabric). But knew whatever I made I wanted it to be something I had never done before, so when it came to me! I want to make some oversized hoop earrings. I got some basswood and a knife blade to also try out during my Cricut Maker review.

What Materials Does The Cricut Maker Cut?
First things first, you may be asking yourself why do I need a maker I have my Explore machine. Well for starters the Cricut Maker comes with a rotary blade specifically for cutting fabric. I will definitely be doing some sort of Cricut maker sewing tutorial in the near future. It also cuts hundreds of materials just as the other machines do.
This cutting Machine also has a knife blade you can use (sold separately) that allows for cutting thicker materials, and it is the only machine that has a scoring wheel you can use for razor-sharp folds.
If that’s not enough, in the box you get:
- Cricut Maker machine
- Rotary Blade + Drive Housing
- Premium Fine-Point Blade + Housing (comes pre-installed in the B clamp).
- Fine-Point Pen
- FabricGrip™ Mat 12” x 12”
- LightGrip™ Mat 12” x 12”
- Welcome book (us only)
- USB cable
- Power adapter
- Materials for your first project
Plenty to get started. And although I didn’t decide to use those for my first project, I do have some plans for it.
Set up for me was pretty easy, I am already a Cricut user, I have a Cricut Explore Air, so my maker is an extreme come up! Anyway, all I had to do was go to the Bluetooth settings on my mac and find the Cricut Maker and connect it, of course, this was after I plugged in and turned on the machine.

Can Cricut Cut Wood?
The Cricut Maker has a whole line of tools that aid in making cutting easier. The Cricut tools include.
- rotary blade
- knife blade (cuts wood)
- single and double scoring wheel (don’t worry you can still use your original scoring stylus)
- perforation blade
- fine debossing blade
And the cricut maker can cut wood, cut faux leather and real leather. Take a look at these teardrop earrings!
Listen I have extreme plans to make ALL the things with my maker, this machine can cut and create so many things! You can use your imagination or there are tons of ready to make projects available, including sewing patterns. This machine has the ability to cut everything from balsa wood to the fabric so the ideas to create are endless!
I am super excited to learn more about my Cricut Maker and the fact that it has given me the motivation to dust off my old sewing machine and get sewing again. With the washable fabric pen, and using the maker and cutting mats to cut my fabric, I may actually be able to get some projects done that I have been putting off.
And with the Design Space Software and Cricut access, I should be able to get tons done!
Does Cricut maker use cartridges?
No, the new Cricut maker cannot take a cartridge, that has been replaced by the ability to make your own designs, and Cricut access. To be honest I didn’t use the cartridge for my Explore Air at all. I totally enjoy the freedom of making my own designs.
So now the moment we have been waiting on, you got the skinny on my new Cricut but I’m sure you want to know how it cuts… Like butta baby!
I have listed below all you will need to make some amazing earrings like theses and instructions.
Want more Cricut Projects?

Cutting Wood With Your Cricut Maker
Learn how to make wooden earrings using the Cricut maker and your knife blade.
Materials
- Cricut Basswood
- Paint
- Earring Fishhooks
- Wood Glue
- Masking or Pinters Tape
Tools
- Cricut Maker
- Cricut Knife Blade
- Cricut Strong Grip Mat
Instructions
- Open design space, and make a circle the size you want your earrings
- Make a second circle, only smaller
- Center the smaller circle into and slice and get rid of the middle pieces
- Make a tiny hole, large enough not to split your wood but not too big, select everything and then slice
- Now you have your earring base
- Type out your letters individually and place them diagonal onto your circles, resizing till you have a placement you like
- Once they are placed where you like them, weld them together, and duplicate them
- You should have 2 sets of letters, now select 1 set and your circle and weld, make sure they are placed where you like them before welding
- Grab your strong grip mat and place you basswood on it, about 2 inches in
 Use your masking/painters tape to secure the wood
 Put your knife blade in
- Load the mat into the machine, and move the white rings as far out as they will go
- Go to back to your design space app and click make it, adjust to cut 4
- You should have 4 sets of letters and 4 circles with the letters
- Adjust the pieces on the mat on your screen mat
- Click continue and then select bass wood and cut
 Let the cricut do its thing, when done remove the pieces from the mat
- You are going to glue 2 of each together and allow to dry completely (you should end up having 2 circles with letters and 2 of the welded letters) apply some sort of pressure so that they dry flat
- Once those dry its time to paint, choose 2 colors and paint the circle part 1 color and the word part another
- Once dry you can glue the circles to the words
- Once that is dry add the fishhooks through the holes


That’s amazing. I was looking at another video about the Cricut Maker and cutting wood and they were saying how it wasn’t able to cut piece as small as I see on these earrings (the inside of the letters, the top hole) however looks like you’ve achieved that! Amazing! I have to try this out!
Aloha. thanks for sharing. may I ask how you made the inside pink? And what the back of these look like? Did you copy and put the same on the other side or??
I painted it