


I really enjoy making these DIY doormats, with just a few things you have a front porch statement piece.
All you need for a DIY doormat is:
- a cutting machine
- masking tape
- a coir mat (grab it at my favorite craft store using a coupon)
- a stencil (make your own using vinyl or make a freezer paper stencil)
- and outdoor acrylic paint or flex seal
To sum it up , these painted doormats are an amazing talking piece for when people enter your home. They even work for covered porches
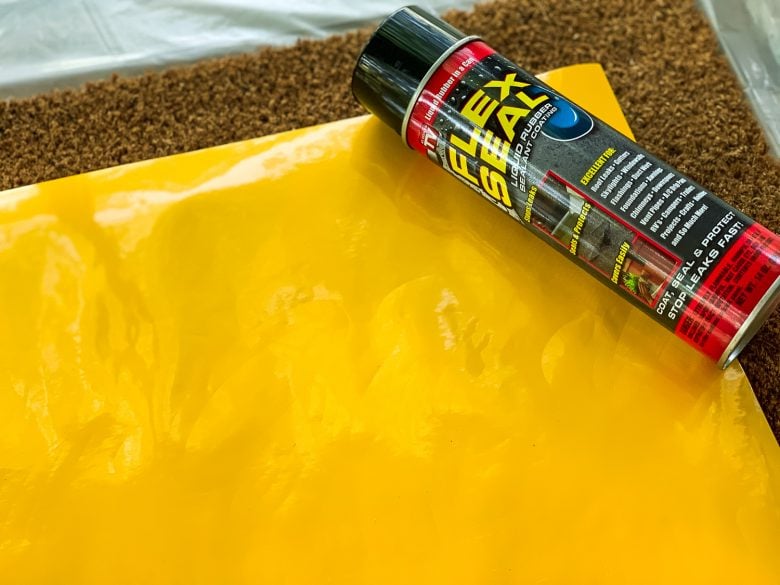
I used flex seal and a stencil on this door mat, but you can easily make your diy doormat hand painted if you don’t have a Cricut machine, or you can make a stencil. Just cut out your design using a craft knife.
You can not only find these coir mats at the link above, but if you’re lucky you can also find them at Home Depot.
Flex Seal Doormat Tutorial
As a result of my generosity, I am super excited you get a free cut file! I usually use outdoor paint and I have even tried spray paint.
But I knew there had to be an easier way. And yall I found it. And today you will learn what I found.
Keep reading if you want to learn How To Make a DIY Doormat Using Flex Seal.

I have done several doormats since I did this post How To Make A Custom Outdoor Mats Using Your Cricut, and actually learned a few things.
- Make sure you have the right paint brush for stenciling here are the ones I use for my Doormat
- Although I did in this one, you don’t have to use the heat press
- This kind of goes along with #2, you need to make sure that you are painting or spraying straight up and down
- When you are cutting the stencil you want to make sure you have either stencil vinyl or adhesive vinyl
How To Make A Doormat With Flexseal
Firstly, let me state, this is not a quick craft. You will need to take some time, however, it is an entirely satisfying craft.
You need time to cut your stencil with your vinyl cutter, time to get the stencil off the transfer tape (this takes the longest if you don’t know how to use transfer tape check out this post on the Cricut site Transfer Tape: Usage instructions) and also time to paint and to allow it to dry.
So even though you can spend a few hours and knock out a few at a time you still need at least 24 hours give or take per mat.

DIY doormats make amazing gifts for housewarming gifts. Free SVG files are awesome for creating anything, especially when you’re a beginner.
Also, an added BONUS this free svg cut file can be used with your Cricut Maker and Silhouette Cameo and even some of their older machines.
So, let me tell you about this new technique I used to make this doormat was Flex Seal!
This came out beautifully, using flex seal on this doormat, I got a thicker more vibrant coating and color. It was amazing! I absolutely love how well this looks.

[convertkit form=3168281]
This is a great product to make and sell. Anything involving home decor. My home is full of amazing things that I have made with my Cricut using vinyl.
If you really enjoy making these DIY doormats, make sure to check out these Doormat projects too Cricut Doormat Stencil Using Flex Seal and How To Make A Coir Mat Using Flex Seal Colors.
Check out these DIY doormats too!
Dollar Tree Diy Funny Doormat With Free Cut File
How To Make A Custom Outdoor Mats Using Your Cricut

Be Our Guest DIY Doormat
Want to learn how to create a stencil using adhesive vinyl and how to use Flex Seal instead of outdoor paint to create a custom DIY Doormat plus a free SVG file.
Materials
- Free Be Our Guest File, Get Access To It Above
- blank Coir Mat
- Adhesive vinyl or Cricut stencil vinyl
- Transfer Tape
- Masking tape
- Flex Seal
Tools
- Cricut Machine
- Cricut Standard Grip Mat
- Weeding Tool
- Vinyl Scraper
Instructions
- Create a design, download the one above or grab one from my shop or Cricut access
- Cut a stencil with your Cricut machine.
- Weed and apply transfer Tape to your stencil (I use some that I have used over and over so most of the sticky is gone)
- Apply the vinyl onto the mat
- Carefully pull off the transfer paper leaving your custom stencil behind onto the mat
- Use the masking tape to tape down the design to the diy doormat

- Using the tape cover the whole mat so that you only get Flex seal where you want it
- Hold the flex seal nozzle directly above the mat, making sure to stay above and spray over your words until they are fully covered
- Remove the vinyl stencil as soon as you are done spraying and allow to dry for at least 24 hours

Great tutorial! How well does it hold up using flex seal? I tried spray paint and it faded very quickly? So far, outdoor acrylic paint has lasted the longest on my mats but I’m curious about this method.
It holds up very well!
Does it last longer than outdoor acrylic paint?
Yes it does
I’ve made mats but all have faded in the weather. Is this more durable and less likely to fade?
Yes. I don’t have any issues with fading with either of my methods
do you seal your mats?
No I don’t
Any advice on getting overspray or flex seal globs off of the mat? Accidentally dripped in some spots and don’t want to throw the whole mat away.
No, that is why its important to tape off all areas you do not want flex seal
About how many mats do you think you could make with 1 can of Flex Seal?
Maybe 5-6, I’m not really sure though.
So cool! I can’t wait to try this. How durable are these painted mats? How well do they hold up to shoes going across them?
Very! They last for a very long time. I change mine up with the seasons.
Where do you get the blank door mats at?
Depends on who has them on sale.
Lol. I mean like do u get them at Walmart, Me adds, Home Depot etc. I have never seen blank ones so that’s what I was asking
There is a link in the post to where I usually buy. But I’ve gotten them at dozens of different places. Too many to list
Hi! Your supply list mentions a heat gun or blow dryer, but I didn’t see that included in the instructions. Do you apply heat to the stencil after taping it down to seal it to the mat, or do you use it after the Flex Seal dries?
I apologize, that was a typo.
A great idea here. Keep it up. Thanks!
I am confused how to get the free SVG files. I found a box and had to enter my name and e-mail address. But for the Doormat with flex seal did not find a place to download it. Do I need to fill in the box everytime I want a download? Is there a library I can find everything in?
It is a pink form above the instructions.