
Today my people you will learn how to make amazing diy epoxy countertops. And if you are looking for a way to redo your kitchen counters with spending an arm and a leg, diy epoxy countertops are the way to go.
Making a beautiful epoxy countertop is really easy, all I used is.
- Acrylic craft paint (you can use some like this)
- Bar top epoxy resin
- Particle board in whatever size you need it to be
- I also used glitter but this is optional
How To Diy Epoxy Countertops At The Bottom Of The Post

This project cost me under $100, I had a heat gun and acrylic paints on hand.
So all I had to buy was the bar top epoxy and I got a gallon here this one here also works, it’s about $5 cheaper and you get free shipping with prime.
And I had got a 4×8 sheet of particle board, only $16.98.
Which makes this a budget friendly project to replace your existing countertops. The great thing is that the doy epoxy countertop is also heat resistant.
I had my sheet cut down to 62×26 because the bottom of my island is 60×24 and I thought that it should have at least an inch overhang.
I used this for the island bottom.this for the island bottom.
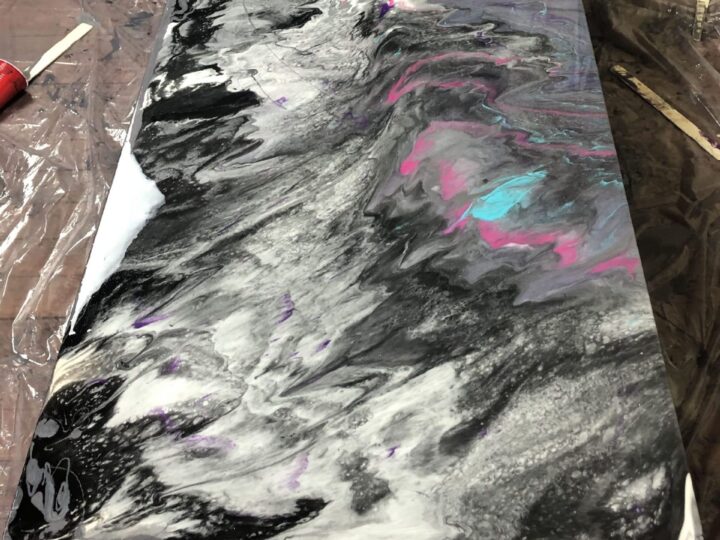
As you can see my DIY epoxy countertop turned out so well! And it took under an hour.
DIY Epoxy Countertops

1. The first thing I did was lay down plastic and prop my board, then grab the colors I used. (I had my little paint the edges black because when I did the table I had a few light spots which, so the paint will help hide if the epoxy doesn’t cover completely)
- Pearl purple
- Hot pink
- Teal
- White
- Black
- Silver
2. After choosing the colors for your epoxy countertops, you need to mix the epoxy.
All of the epoxy I have ever used has had to be mixed 1 to 1, but make sure you read the instructions fully. Also, make sure to mix until you see no streaks in the epoxy, don’t stir too fast, you don’t want a ton of bubbles.
I never mix enough, I made up 48 ounces, not enough, needed another 48, but I would rather have too little to cover the countertops then too much, I can always make more.
3. Once the epoxy is mixed, divide into separate smaller cups, these smaller cups are what you are going to mix the paint into. Give the paint a good squeeze and mix well, again don’t stir too fast, you don’t want a ton of bubbles.
I used more silver, black and white, then the other colors. You also add glitter if you want it, in this step.
Diy Epoxy Countertops
4. Once you have your colors mixed you can do a few things, 1 a dirty pour which is what I did.
I poured 1 color after another without mixing them. You can also keep them separate and pour them on your diy epoxy countertops and just fill in where you want to with which color.
I am planning to do this on some canvases I have to hang on the wall.
5. Once you have your color on you want to tilt and turn your particle sheet as to create a sort of marbling, or swirling.
Epoxy is self-leveling so you will get a lot of drippage on the floor, or table, pick those drips up to cover any spots that may need epoxy and also to help with covering the edges.

6. When you are almost happy with it, I like to use my heat gun to move the colors around a little, being careful not to leave the heat in 1 spot for too long, it will burn, the heat is also good for removing bubbles.
7. When you are completely happy with the look, leave it be!
Allow it to sit about 2 hours, and take a putty knife, I like using the plastic ones, to remove the drips from around the bottom edges. Do this about every 30 mins or so until you see no more drips.
I like to allow my projects to sit overnight to fully cure.
Check out these too
Heat Transfer Vinyl: How To Remove HTV With Iron
Easy Easter Bunny Butt Cookies Recipe With Video!
DIY Epoxy Countertops
Materials
- Acrylic paint in the colors you want your diy Epoxy countertops to be
- Bar top epoxy
- Particle board in square footage you need
- glitter (optional)
- Cups or buckets to mix
- Paint Stirrers
- Drop Cloth
- Putty knife
Tools
- Heat Gun
Instructions
- Lay down drop cloth
- Use something to prop your board up off the floor
- Mix the epoxy according to the package directions.. I used about a 3 quarters of gallon or so on my counter
- To do a dirty pour like I did in the video, separate the epoxy into smaller cups and add color and glitter, then pour the colored epoxy back into the larger cup carefully 1 color at a time
- Pour the mixture on the table and tilt the board to cover the surface
- Once your board is covered use the heat gun to move the colors around a bit
- you can also use alcohol in a spray bottle to get some cool effects
- Allow to sit about 2 hours and using a putty knife remove the drips that are under the table
Recommended Products
This post and some photos may contain Amazon and other affiliate links, I will be compensated if you make a purchase after clicking on my links.


Is epoxy heat resistant? Scratches? I plan to use it on my kitchen island countertop and wondering if it is practical as such?
I haven’t had an issuer with scratches. But don’t use much heat on it but I’m gonna say yes it is resistant because bar tops are usually covered in epoxy
Did you post part 2? I can’t seem to find it.
No, I actually never got a chance to finish it. I really should update that post.