Step and Repeat Photo Backdrop with The Cricut

How to Make A DIY Photo Booth Backdrop
What I love most about this step and repeat backdrop is how simple the process is.
You don’t need a photography studio to have a beautiful baby shower or bridal shower party photos.
You can add a few studio props, photo booth props or put this diy photography backdrop on a backdrop stand and leave it pretty much as is.

And the best part is there is zero turn around time because you are making it yourself!
Granted it will take you some time to apply the design you want, but within a short time, you will have a backdrop that is affordable and fit for your event. I use a sheet to make this diy backdrop so it makes it extremely affordable.
I can’t even imagine the price tag on this if you were to buy this from a printing company.
Grab your Cricut Air 2 and create your custom design and print off a ton of them. Then lay them out and start ironing them on so they are evenly spaced out. I used my ruler for this and it worked really well.
I find that heat transfer vinyl is nice because it allows you to work pretty fast once you get the spacing figured out.

Tips For Elevating Your Party
Lighting
A bit area is making sure you have the right lighting. If you want dim lighting, reach for twinkle lights or lamps with light bulbs. Make sure the ambiance of the room fits your party. Or if you want it to be well lit ensure you have enough lighting so your guest can enjoy.
Drinks
Create a drink that is special for your party. Whether it is an evening cocktail or a mocktail (no alcohol) give your guest something fun to sip on. I like to take a really tasty drink and then come up with a name that fits the event. This let’s guest feel like they are enjoying a drink made specifically for your party.
Have Fun
Make sure you try to have fun at your party. Plan ahead and get things lined up so you aren’t spending your whole party running around getting things done. Invite special guests, have games, or even music playing to keep the beat light and relaxed. Having a photo booth with one of these photo booth backdrops is always a winner.
Theme
Create a well-rounded theme for your party. From the foods, you serve to drinks and decorations. When you have a theme it is all smooth and flows nicely.
Party Favors
If you can afford it consider handing out a party favor or two. Whether it is a candy bar you let your guests scoop up some goodies they want, a wine glass, or even shirts, let them leave with something in their hands.
Want even more Cricut and Design Space Tutorials? Check these out!
Using Cricut Design Space Slice Tool For Pattern Fill Print and Cut’
How To Remove A Background In Photoshop And Then Replace The Background
First Day Of Kindergarten: Plus Free SVG Files For Cricut Design Space

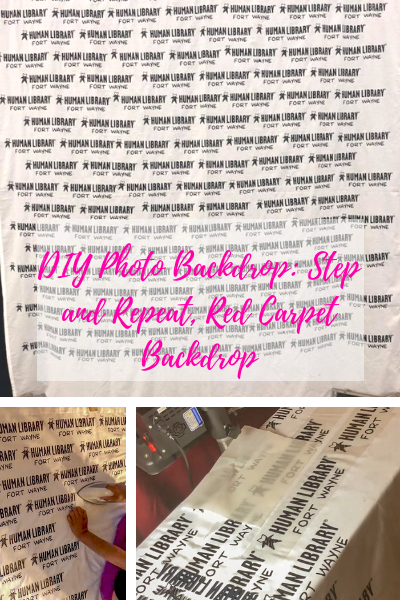
DIY Photo Backdrop: Step and Repeat, Red Carpet Style Backdrop with Your Cricut
This step and repeat backdrop was super simple to make, all I had to do was choose my backdrop background cut and apply. And very little supplies needed. Just the vinyl, of course, my Cricut and weeding tools, a sheet and iron or the Cricut easy press.
Materials
Tools
- Cricut Air 2
- Heat Press or
- Easy Press
- Weeding tool
Instructions
- Create and cut out your design with HTV.
- Fold over the top of your sheet and use the fabric bond to create a loop that you can fit a pole through.
- You can press your design 1 of 3 ways, you can go through with an iron and get the image on that way, and then go back and press as I did in the video. Use the Easy Press or Press in sections using a board (see video)
- Make sure you stagger with each row.
- If I had an easy press that would have been the easiest way to do this, but I used the board and pressed in sections folding the top, pre-pressed over the top of the board, next time I will be buying the easy press lol.
Notes
See video if you have a hard time understanding the written instructions


2 Comments